Client Side Rendering Vs Server Side Rendering in React js & Next js

Hi Guys in this article I want to share with you my experience of starting working with Next.js .We will discuss about the benefits of using Next.js and comparing server side rendering with client side rendering in React js and role of Next.js in making a server side rendering react application . We should have a basic understanding of the several things for this discussion:
- What is Client Side Rendering ?
- What is Server Side Rendering ?
- Server Side Rendering Vs Client Side Rendering ?
- Benefits of using Next.js
- Small implementation of Building Application using Next.js
Before discussing our discussion I am sharing some reference of Next.js:
- Next.js Documentation: https://nextjs.org/docs
2. Next.js Crash Course: https://www.youtube.com/watch?v=IkOVe40Sy0U
Before going through the documentation you can go through the video it’s really nice and the documentation is also descriptive and self explanatory.So let’s begin our discussion..
- What is Client Side Rendering ?
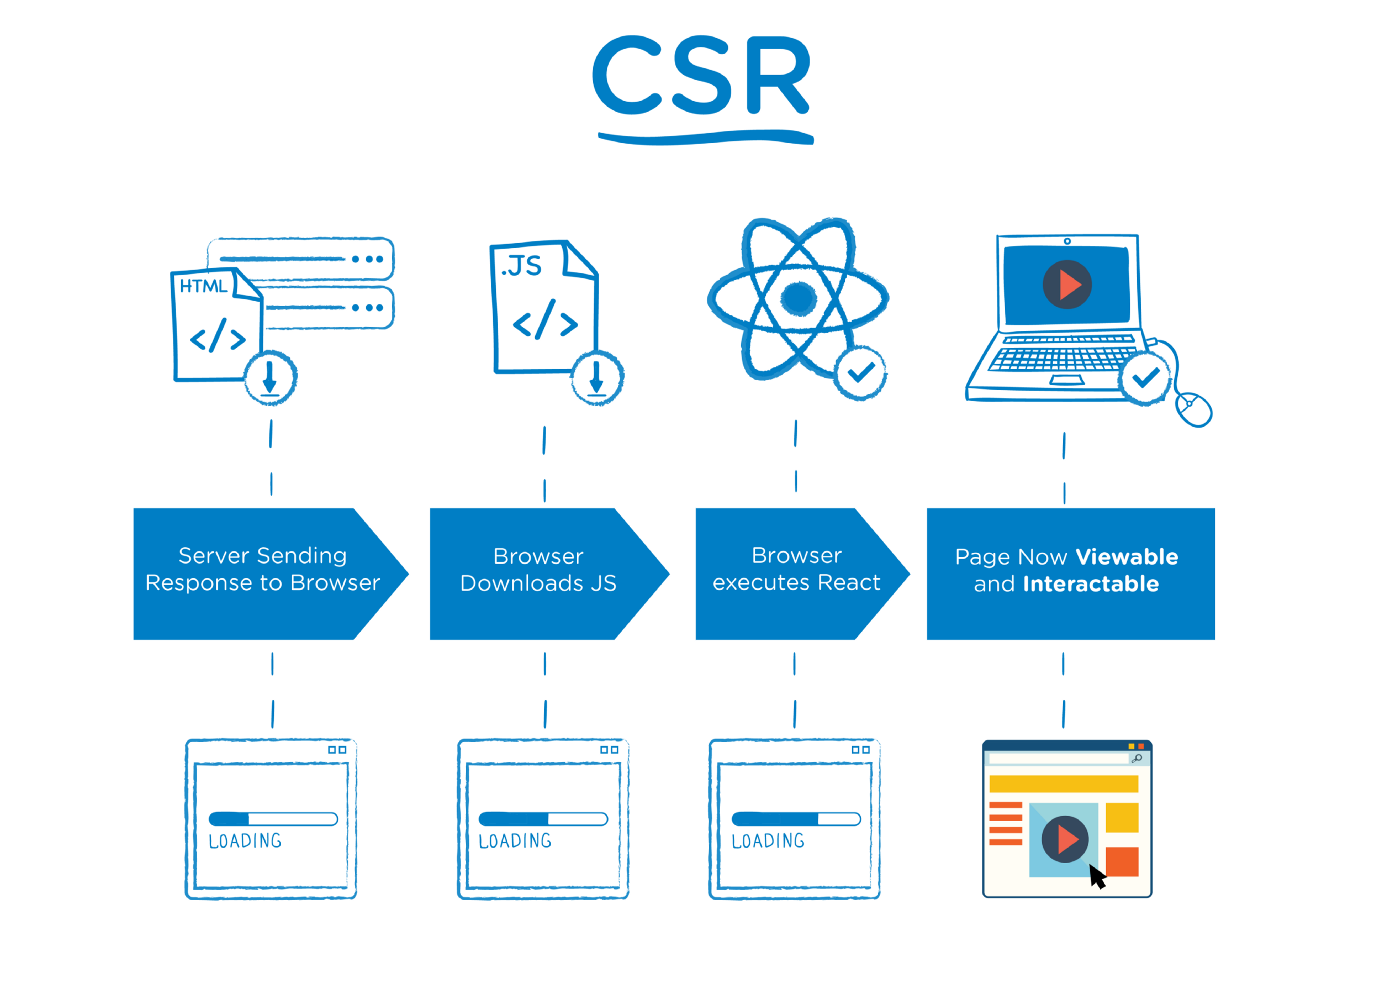
Client-side rendering is a reasonably new approach to rendering websites, and it didn’t really become popular until JavaScript libraries started incorporating it.
When we talk about client-side rendering, it’s about rendering content in the browser using JavaScript. So instead of getting all the content from the HTML document itself, a bare-bones HTML document with a JavaScript file in initial loading itself is received, which renders the rest of the site using the browser.
With client-side rendering, the initial page load is naturally a bit slow. However, after that, every subsequent page load is very fast. In this approach, communication with server happens only for getting the run-time data. Moreover, there is no need to reload the entire UI after every call to the server. The client-side framework manages to update UI with changed data by re-rendering only that particular DOM element.
2. What is Server Side Rendering ?
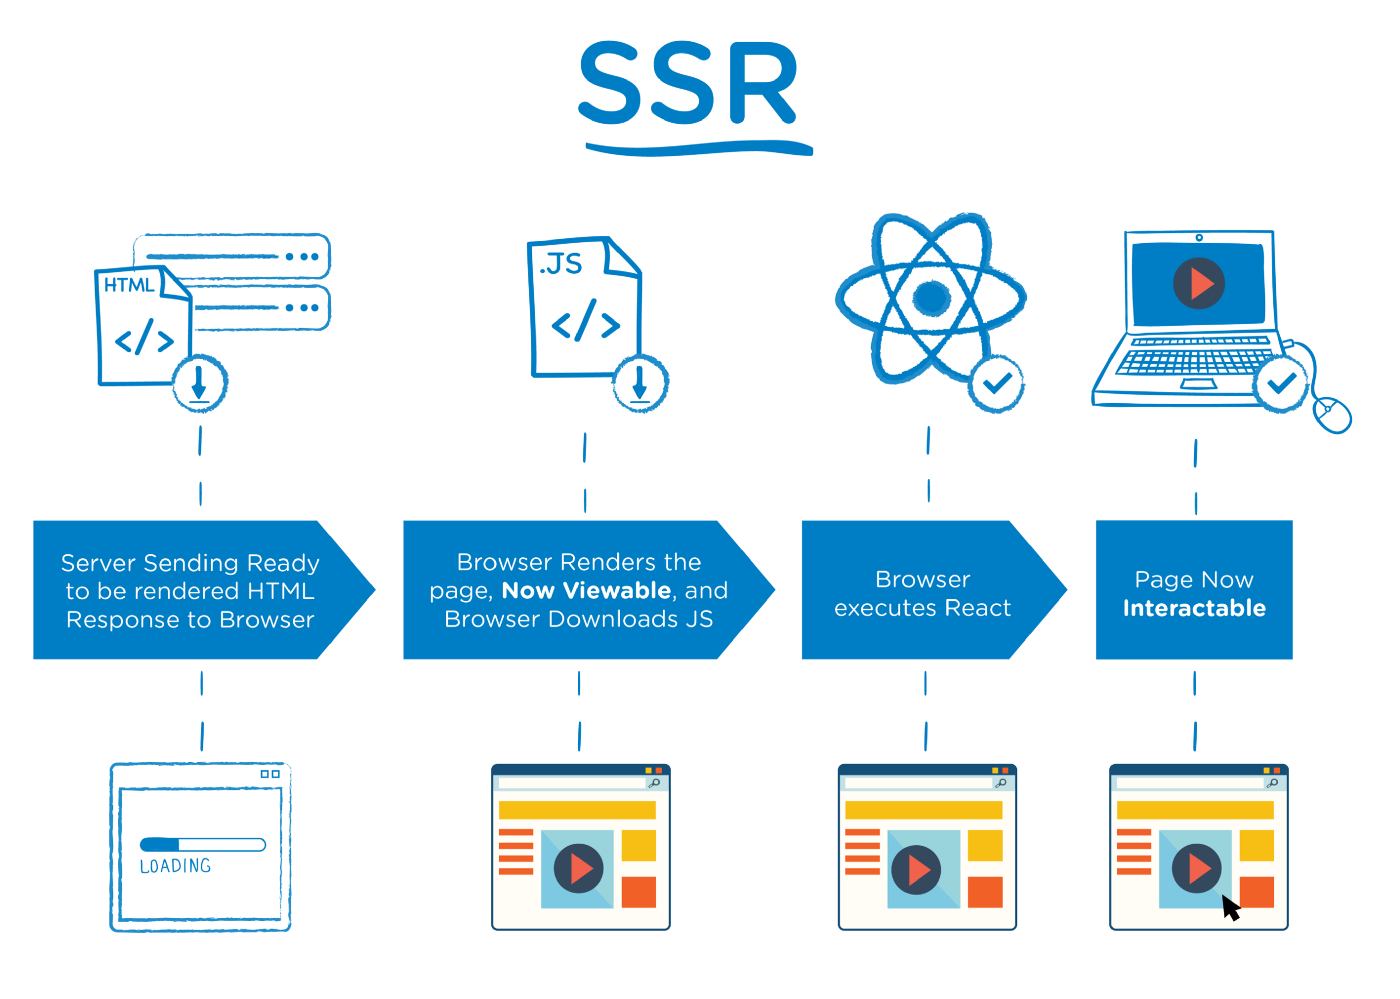
In server-side rendering when a user makes a request to a webpage, the server prepares an HTML page by fetching user-specific data and sends it to the user’s machine over the internet. The browser then constructs the content and displays the page. This entire process of fetching data from the database, creating an HTML page and sending it to client happens in mere milliseconds.
3. Server Side Rendering Vs Client Side Rendering
The main difference is that for SSR your service response to the browser is the HTML of your page that is ready to be rendered,while for CSR the browser gets a pretty empty documents which links to your javaScript. That means your browser will start rendering the HTML from your server without having to wait for all the javaScript to be downloaded and executed ,In both cases , React will need to be downloads and go through the same process of building a virtual DOM and attaching events to make the page interactive but for SSR,the user can start viewing the page while all of that is happening .For the CSR world you need to want for all of the above to happen and then the virtual DOM moved to the browser DOM for the page to be view able.
Pros of Server Side Rendering :
- Search engines can crawl the site for better SEO.
- The initial page load is faster.
- Great for static sites.
Cons of Server Side Rendering:
- Frequent server requests.
- An overall slow page rendering.
- Full page reloads.
- Non-rich site interactions
Pros of Client Side Rendering:
- Rich site interactions
- Fast website rendering after the initial load.
- Great for web applications.
- Robust selection of JavaScript libraries.
Cons of Client Side Rendering:
- Low SEO if not implemented correctly.
- Initial load might require more time.
- In most cases, requires an external library.
4. Benefits of using Next.js:
Next.js is used for server side rendering of react application .React along with other framework like angular and vue.js are traditional client side framework ,they run in browser but there are technology to run this framework on server side, and next.js is a solution for running react application server side.It also makes react development very simple.Some core features of Next.js are:
- Server rendering React Apps.
- Automatic code splitting and lazy loading.
- Built in CSS support.
- Hot Reloading support.
Going to production with react is really complex actually .Next.js is a framework for React that scales with your project. You start off with a static website , and as project goes page got added. All these pages may have different requirement in that case Next.js is really useful.For create React Application the size of the largest initial JavaScript is important during the first loading for both the display of all content and for the application becoming interactive.
For Next.js ,during the first load ,the size of largest initial JavaScript bundle is only important for the application becoming interactive, the display of all content is mostly unaffected by it.
It’s important for create-react-app and Next.js that the largest initial JavaScript bundle to be minimized .In both cases this is easy to accomplish using bundle splitting , In the case of Next.js ,however ,bundle -splitting happen automatically in common situations. We actually are using server side rendering for two reasons .
- Performance benefit of our customer.
- Consistent SEO Performance.
So you may think what is SEO , it stands for Search Engine Optimization which is the process of increasing the quality and quantity of website traffic by increasing the visibility of a website or a web page to users of a web search engine. SEO refers to the improvement of unpaid results (known as “natural” or “organic” results) and excludes direct traffic/visitors and the purchase of paid placement. SEO may target different kinds of searches, including image search, video search, academic search news search, and industry-specific vertical search engines.You can refer to this link to know more about SEO:
https://searchengineland.com/guide/what-is-seo
5. Small implementation of Building Application using Next.js:
So it’s start coding ,to start with Next.js ,First we have to do basic setup .We have to create folder then open the terminal and run npm init -y ,then we have to install some npm packages like next ,react,react-dom and isomorphic-unfetch by running this command on terminal: npm install next react react-dom isomorphic-unfetch
Let’s see the file folder of our code:
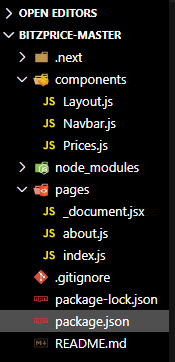
In our code base, there is a package.json file having the basic setup. The pages folder contains all the page route means the file inside pages/index will render on our base route localhost:3000/ and the file inside pages/about will render on route localhost:3000/about. The components folder contains all the component which will be render inside page route. Next.js comes with it’s own code splitting technology.Let’s see the package.json file:

In package.json , dependencies is having all the npm package and scripts are all the scripts which are used to run our application.Now let’s see the Layout.js inside components folder:
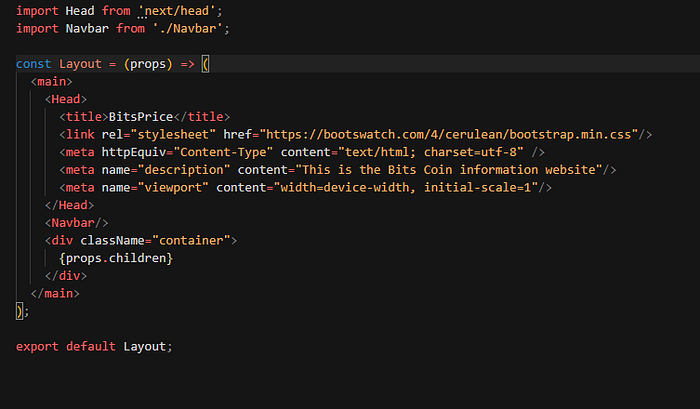
In Layout.js we have imported Head from ‘next/head’ . We have imported Navbar from ‘./Navbar’ .We have created a layout which is common in all the pages of our application .Inside Head we have added the cdn of Bootstrap , we have added meta tag for content type ,description and viewpoint these are required to make your increase accessibility and SEO of your application.Then we have placed our Navbar, after that inside the div with className= “container” we have placed the children means ,the Layout component will work as the wrapper of our application.Now let’s see the Navbar.js file:
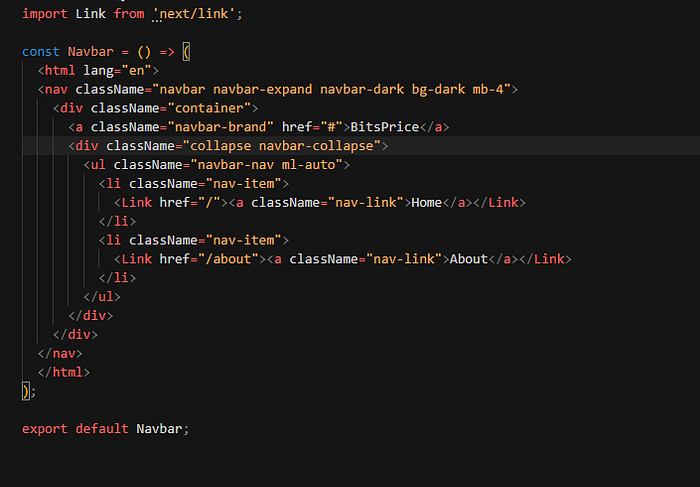
In Navbar.js we have defined the Navbar of our application we have imported Link from ‘next/link’ .This Link tag is used in Next js to handle the transition between different pages of our application .So inside li tag we have placed Link tag and connect Home button with index.js or base route and About button with about.js or ‘/about’ route.We used bootstrap classes to style the Navbar component. We have added lang in our html tag this is required to increase the accessibility of our application .Now let’s see the index.js file:
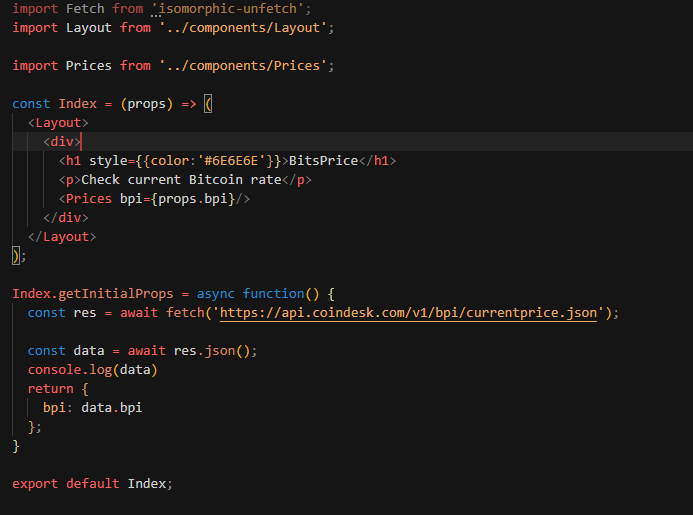
In Index.js file ,we have import fetch from ‘isomorphic-unfetch’ for performing fetch operation.We have imported common wrapper Layout and we also imported Price item which displays the current Bitcoins rate.So Next comes with a function called getIntialProps which is a asynchronous function which fetches the data and return an object as a props to the component.So what we are doing we are defining the asynchronous function which is fetching data from the api and while we get response we are storing it inside the data then that function is returning the object having bpi as the argument which is carrying the bpi data. This object can be accessed by the component Index as props so inside Index component we are accessing the props and sending the bpi data to price component to make them rendered.Now let’s see the Price component:
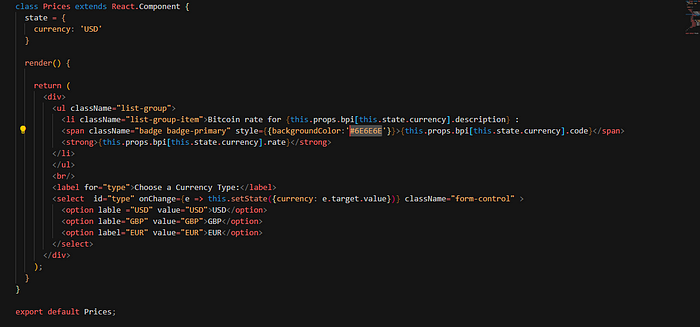
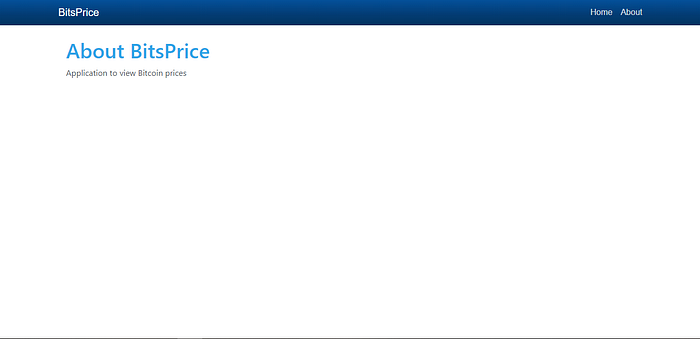
In Prices.js, we have created a state called currency,which stores the currency in which we want to see the Bitcoin value .After that we are rendering the details using the value of the currency from state, we have also used select tag to select the currency value of the Bitcoins.Now let’s see the about page :
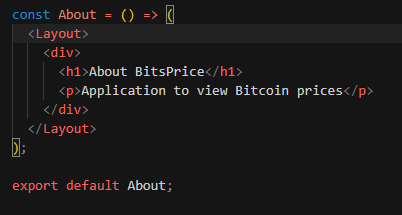
About.js is self explanatory it’s just rendering a header and paragraph.Now let’s see the _document.jsx file:
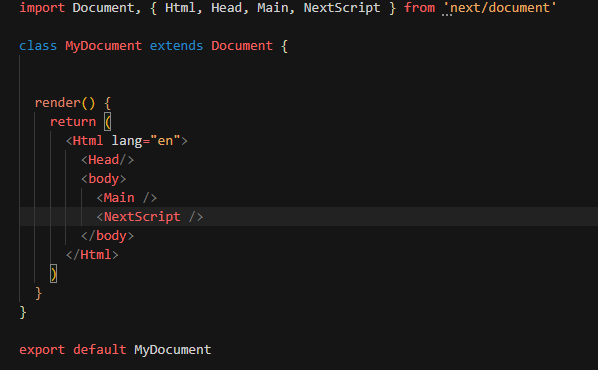
Actually this file is not required for this application, if you have gone through the documentation you will see there is a advanced section which is having this file _document.jsx, this file is mainly used to increase the Search Engine Optimization and Accessibility of the Application.
So Our Application is up and running Now we will run npm run dev to see our application:

If you have seen the video link I have mentioned above .It’s the same code .I have added the head tag in Layout Page having all the meta tags and language to the html DOM. Now let’s run an audit test to test the SEO and Accessibility of our application .To run an audit test we have to open google developer tools and we have to go to audits tab after that check the SEO & Accessibility option and select Desktop option and then click on Generate Report Button. And let’s see the report:
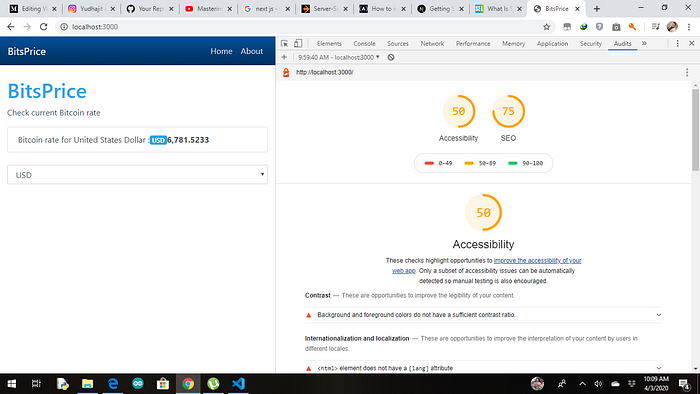
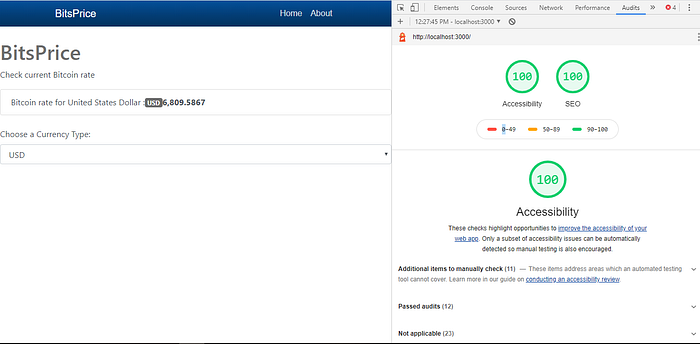
Thus we can see using Node-js we have rendered the react app on server side ,which made our application to have a audit report of 100% accessibility and 100% SEO .I am attaching my GitHub link for the code base of this tutorial Github Link:
So there are many cool stuffs you can do using Nextjs, you can check the documentation and can utilize all the features that comes build-in with Next js , till then don’t stop exploring new things because exploration makes a person better in all aspects of life.
HAPPY CODING…..:)